This is part 2 of a series on creating a Chrome extension for use by members of a development team. We use a version of this tool here at WegoWise.
Have you ever been investigating an issue, flipping back and forth between production, staging, and your local machine, when it hits you: Did I just make a change on production!?
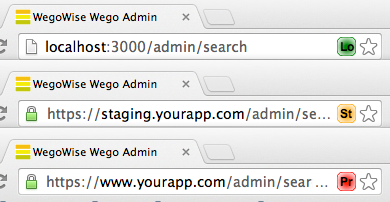
The goal of this extension is to read the url of the tab and display an icon if it's one of the domains we're concerned with. The icon's color and text will be set according to the domain, and we will change that color and text by creating a canvas object and rendering it.
Ideally we would have liked to do something really flashy like change the background color of the page or perhaps change the look and feel of the browser itself. Chrome has a theming mechanism that can change how the browser looks, however at this time you cannot change the theme from an extension. You can modify the HTML of any page from an extension, but that creates potential problems because you could inadvertently change the behavior of the page. A third option is to add an icon to the location bar which is what I decided to do.
The first thing we need to do is make a small change to the manifest.json. Since we need a canvas element to create our button we change background to reference an HTML file. The HTML file takes care of loading our script from the first part of the series.
The second change is to tell Chrome that we will be creating a page action. The only parameter required is the title of our extension. Now we have a page action which we can reference in our code.
For this project we're only going to use the HTML file in order to load our javascript and provide a canvas element. Chrome allows you to do a lot more with this file for example it can be rendered as a popup with html, buttons, form elements, etc. You're only limited by your imagination and the restrictions of the Chrome sandbox.
For configuration information I've modified the menu object from the previous installment:
We need to configure Chrome to execute a function for two events, when the location bar is changed:
and when a different tab is selected:
Due to the way that Chrome events fire, tab activation does not provide the currently selected tab. Instead it needs to be retrieved separately. Either way, once we've got a handle to the tab, we need to check to see if the domain for the tab url is handled by our menus:
If we don't have one of our specified urls then we will hide the page action for this tab. Assuming that the url is for one of our domains the next step is to show the icon:
You will notice that we call the draw function to provide image data to the the page action. The example including the draw function can be found in this repository, which you're welcome to fork and modify as you like. You can create any type of image that you can make on a normal canvas including animations. Just remember the final image can only be 19x19 and animations are annoying. Alternatively you could just provide an appropriately size image and pass that along to the setIcon function.
The example project can be found in the Chrome Extension Blog repository.
The last part of this series will cover different deployment methods including packaging, signing, and distributing your extension. Depending on community interest I may also do a supplement on using an Arduino to control an RGB LED strip as part of the page action outlined in this article.